Saturday, February 2, 2013

Some Finishes and Primitive Quilt Magazine

 First I must apologize for my poor pictures, there must be more to point and shoot.
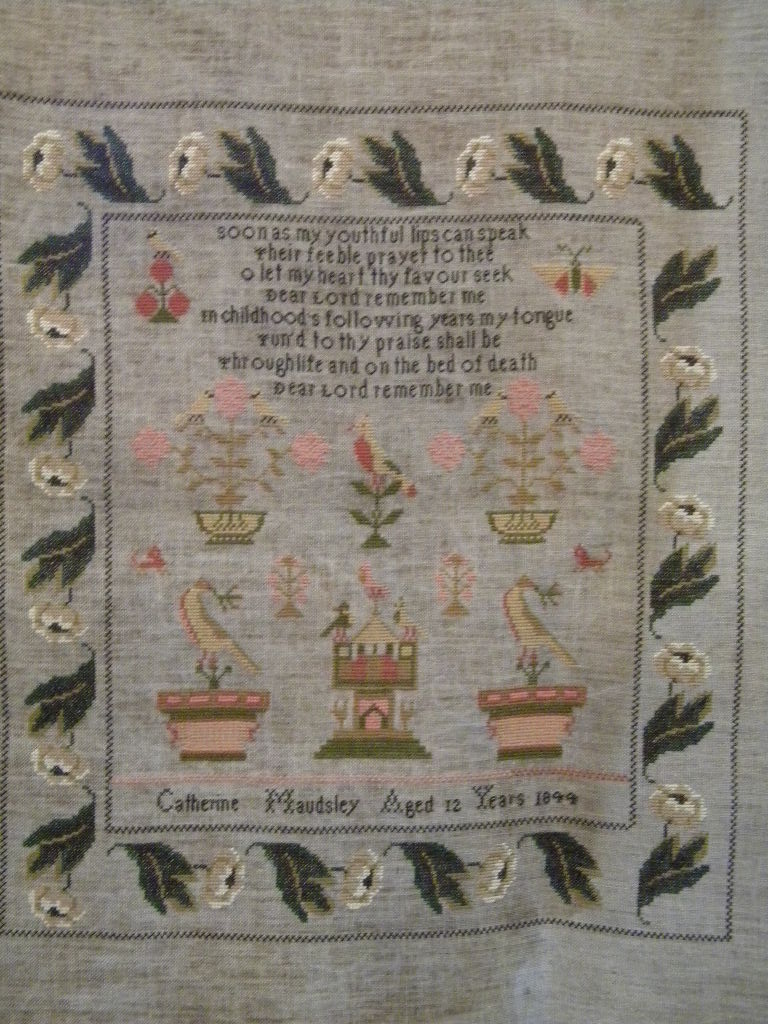
 Catherine Maudsley by Drawn Thread
I finished in December, but am just now getting pictures up.
It is stitched in the called for silk and wool, but I changed the linen to a greyish distressed linen from R & R did not write down the name.


 I also have finished two Scarlet Letter Samplers that were begun who knows when.
Rebecka Watson
Again the photo does not do this sampler justice, I think framing it will allow more of the detail to show up.
When I once again picked up this sampler last week there was not much left to finish.
I recommend not saving the harder bits till the last, not because they are hard, but because I become impatient to finish and find that I want to rush through it.


 Another Scarlet Letter 
ABCD 1817
If you look this one up on the website you will find that mine does not look exactly like it...
The kit did not contain enough of the gold silk and again due to impatience to finish I added the red in its place.  I'm still trying to decide if I like it, but its over one and I think its here to stay.
I'm planing for a different finish for this one so stay tuned for that update.

Have you seen the Magazine Primitive Quilts and Projects?
It is a wonderful magazine filled with projects that range from quilting, cross stitching, to wool penny rugs something for everyone.
Well I have two extra sets that are for sale
Set 1
Fall 2012 and Spring 2013
$14.00 for both shipping included in US.
 Set 2
Summer 2012, Fall 2012, Winter 2012, Spring 2013
$28.00 shipping included in US

If your interested please send me an email at sutton.carmen@comcast.net
Hope you have a wonderful weekend.

Wednesday, January 16, 2013

Framing Tutorial


Well I am finally getting around to presenting my Framing Tutorial it only took one year so I hope the information will make up for the delay.
I hope that you take this information and use what works for you and modify what doesn't this is the method I use, but I'm sure like everything there is more then one way.

Items needed
Finished Needlework
Mounting Board (Acid Free Foam Core or Mat Board)
Frame
Straight Pins
Scissors
Quilting Thread
Ruler

Types of Mounting Board
Sticky Board - Avoid at all costs as you will be unable to remove your fabric from board.  It also contains  chemicals that will harm fabric over time.

Pins - Attaches needlework to foam core board with stainless steal pins, pins remain in work OK as long as pins don't rust.

Linen Tape - Attaches needlework to mounting board with a two sided acid free linen tape

Lacing - Attaches needlework by lacing piece over the mounting board using quilting thread.  This is the purist form as no foreign items are added to the needlework.


Preparing Needlework for Mounting
Wash needlework if fibers and material allow washing

Press, Place needlework right side down on fluffy white towel, to prevent crushing of stitches if using over dyed or non colorfast threads be sure to turn off steam.

Take to framer and decided on frame, matting (optional) and how much linen border will be showing.

How to Measure Needlework Piece
Measure the design area, outside stitches for both length and height.

Linen Border is the linen that lies between the design area and the frame. This is the linen you see when the piece is hanging on the wall.
  • Border can be of equal width on all four sides.
  • Border with the top and sides of equal width and the bottom has a larger width (usually art work is framed this way).  
  • This is all up to individual taste, but for a teaching example we will look at a  1/2 inch linen border showing on all four sides.  Please note that there is a lip on the frame, which holds the glass and needlework in the frame.  It is 1/4 inch wide so this has been added to the 1/2 inch border that will be showing.

                                                 Width                 Length
                      Design Area   8 1/2 inches   X    14 3/4 inches
                      Right Margin     3/4 inches            
                      Left Margin       3/4 inches
                      Top Margin                                  3/4 inches
                      Bottom Margin                             3/4 inches
                                             ___________________ 
                      Mounting       10 inches   X   16 1/4 inches
                       Board
  • Have framer cut foam core to calculated size.  Make sure to have the framer check the lip depth on the  back of frame to see if glass, foam core and backing board will all fit into the frame.  If the lip is shallow then lace onto a piece of acid free mat board.
Now time for modification
I had a ready made frame that I thought would work on my needlework

It measures  4 7/8 inches  X  6 7/8 inches
Because this is the Mounting Board dimension I need to figure out what that leaves for linen margin on all sides of my piece.

                                                  Width   X    Length
               Mounting Board    4 7/8 inches    6 7/8 inches
               Design Area      -  4 4/8 inches    6 1/8  inches   
                                                                                    
              Total Linen Margin   3/8 inch  X   6/8 inch
              Divide by two        3/16 inch  X  3/8 inch                               

Here I have cut my mat board to the 4 7/8 X 6 7/8 inch dimension place in frame to make sure that you measured and cut correctly.
On the front of your stitched piece measure out from design the amount of your linen margin
In my case 3/16 inch on each side  and 3/8 on top and bottom.  Place a pin at these spots.

Turn over stitched piece so front is facing down, center cut mat board between the pins.
Pin in place with one pin in the center of each side.
Working from the center and moving towards the corners, pin needlework every 1/4 inch. Repeat until all four sides are pined.  When pinning follow along on thread of linen ground fabric to insure that the piece will be straight.

You may need to trim excess linen at this point should have 1 1/2 inches extra per side, but for a small piece may be less.  The extra should not meet on the backside.

Miter the corners.
Turn needlework face down and fold in corners, pin in place.  Finger press.

Now fold in each side and pin in place

Whip stitch the corners closed with quilting thread.  You want the fold to be nice and neat, but your whip stitching will not show so you don't have to be to careful.

All corners done, remove the pins from the corners only.

Lacing
Thread needle with quilting thread, leave attached to the spool (I place spool in a box or the frame so it does not roll off the table)
Begin Lacing top to bottom moving from the right to left hand side of work.  Space each stitch approximately 1/4 inch apart.  When the left had side is reached fasten thread securely.  Moving from left to right pull each lacing taut (do not over do as it can put extra stress on fabric and bend the mat board).  Cut the thread from the spool and re thread the needle and fasten the lacing securely.


Repeat the process from side to side. 
 I turn my work so I am always lacing top to bottom but I did not flip the photos before posting them.


Your needlework is now ready to frame.

 
Pop into frame
If using glass be sure to clean first on both sides and be careful not to cut yourself.


Place backing board in (I used foam core)
Hold in place with glazing points (they were at home during photo shoot so do not strain eyes trying to spot them in picture).

Cover back with brown paper.
Framing is complete!!!! 


Sunday, January 6, 2013

Happy New Year

I hope everyone had a wonderful Christmas and are now working on a Great New Year.
I was very happy to have a few days off from work and it was very grey and cold out so I did not feel at all guilty about stitching all day!
So what was I able to finish?
A few Christmas pieces

Notforgotten Farm
Hoe, Hoe, Hoe
Fabrics in the corner are what I may use in finishing

Notforgotten Farm
Saint Nick
Not the same as original due to difficulty in reading the tiny chart but was way to far in to start ripping.
This was a Christmas gift
 I saw the idea on line, but I can not remember source if you do let me know so I can give credit where credit is due.
My progress on Scarlet Letter's Huntsman
Even though it will be solid stitched it has been moving on pretty quickly.
Well I'm off to stitch
My next post will involve a give away thanking you all for visiting I now have over 200 followers and just over 100 posts.
May your fingers fly!

Sunday, December 2, 2012

WHO


Well your probably wondering WHO I am since it has been so long.
Many things have happened in the last two months and before I knew it time had passed.

I did finish this Carriage House, Houses of Hawk Run Hollow.
I won't tell you when it was started, that means Bridgett you are sworn to secrecy.

Do you all remember The Fuzz, well this week we lost her after 12 wonderful years.
She was one of  three sisters and we only have Koo left she is the cross eyed ice cream eating cat in the header.
It was wonderful having three siblings to watch over the years they all looked so different and of course their personalities were very different also.
Fuzz was shy, but by far the sweetest of the three, she will be missed.

We could not stand such a quite house so after a few days we were off to the pound and found a new friend for Woo. 
Looking at these pictures it looks like we got Woo's twin.
Woo is going have to get used to her "mini me"
Well it looks like the house is still going to be quite you say judging by these pictures, but it is just not so as the other pictures were just a blur.

 I saw a post on Merry Wind Farms blog of this sampler
I had started it with the colors called for and put it down very quickly because I was just to lazy to change them up, they were way to bright for me.
When Melinda was kind enough to share her color changes with me I was off and running and I must say that she did a great job as I was able to stitch it start to finish from Oct 5th to Dec 1st.
I really need some lessons in photography these seem a little washed out in color.


The last exciting thing that I did since I last talked with you all was jumped on board with
It is a stitch along to celebrate Nicola's 50th birthday year, she has invited any and all to help her celebrate by stitching Scarlet Letter Samplers through out the year, sharing your progress as you go.
There will be lots of encouragement from fellow stitchers and wonderful drawings each month for those that need extra encouragement.  It will be an exciting year full of wonderful accomplishments.
So if you feel adventurous take a look, tell your friends and sign up, because more is better.

Tuesday, September 25, 2012

Continue the Momentum

We received this thank you from Momentum Dance Lab. Our  total for donation was $362.00 way to go!!!

From everyone here at Momentum Dance Lab, we would like thank you so much for all your contributions!


We have a very exciting project coming up that we are pleased to announce you have been instrumental in making happen. This spring we will be partnering with the annual Dogwood Arts Festival to do our part in fostering love for the arts and bolstering attention for home-grown creativity and innovation. Art Moves has been our annual spring performance in which we showcase choreography inspired by regional art and created in tandem with music composed by local musicians. This spring we will be incorporating this very idea into the Dogwood Arts Festival and will be featured in several performances throughout its duration. This creative process is complex, intricate, and challenging, but it is one we hold dear to our hearts, and we believe this upcoming show will be our most successful endeavour yet! Performance schedule coming soon!

Not only are we alive and well in the Knoxville art scene, but we were also very fortunate to have performed at the Piccolo Spoleto Arts Festival held every year in Charleston, South Carolina. Piccolo Spoleto has been bringing a wide range of artistic works from all over the world to South Carolina since 1979. In May of 2012 we participated in all the fun for the first time and are hoping to perform again next year.

Momentum Dance Lab has been striving to keep dance alive since 2007 and our sponsors’ support (all of you out there!) and our passion for our art are what have made it all possible. Again, we thank you for your interest in our dance company, and as we continue to explore inspiration in the world around us, we hope you will do the same!

To join our mailing list to receive news, performance updates, and class information please email us at momentumdancelab@gmail.com. Keep up with us on our Facebook page as well! http://www.facebook.com/pages/Momentum-Dance-Lab/60442490140

Continue the Momentum!

Gabriella Dorado (teacher, choreographer and dancer with MDL)

and Momentum Dance Lab of Knoxville, TN

Wednesday, September 5, 2012

Thank you all for the huge success of the auction.  I will be sending out emails to those that won this evening.
So I can collect mailing address to get your winnings into the mail.

Last Chance

The bidding for Momentum Dance Lab's Silent Auction will be ending today at 6:00 pm central time.  So take a look there are still some real bargains to be had.